CONTACT US

Welcome to our Award Winning Bindery Success Blog!

Saddle Stitcher Signature Registration - 5 Tips

[fa icon="calendar'] Thu, Feb 17, 2011 / by Andre Palko

[fa icon="comment"] 1 Comment

Saddle stitching machines that use a chain upon which folded signatures are dropped can present the operator with signature registration problems for many reasons. Different sized signatures, mechanical issues, a stretched chain or improperly set feeder pockets can prevent the signatures from jogging to the head consistently. Some problems can also cause signatures to ‘de-jog,’ if you will. If there is crossover registration in the stitched book, these mis-registered signatures can ruin the finished product.

Read More [fa icon="long-arrow-right"]

Printing Business Fads - 5 Tips for Survival

[fa icon="calendar'] Wed, Feb 09, 2011 / by Andre Palko

[fa icon="comment"] 1 Comment

Management fads come and go, even in our printing and bindery businesses. Six Sigma. Sensitivity Training. Management by Objective. Core Competency. Management by Consensus. 'Fun' is one of the current fads. Twitter, which prides itself on wackiness, has a team of people whose job is to make people happy. Seriously.

Read More [fa icon="long-arrow-right"]

New Folding Machine Section for Heavy Stocks

[fa icon="calendar'] Thu, Jan 13, 2011 / by Andre Palko

[fa icon="comment"] 1 Comment

The very nature of the creasing solutions offered here at Technifold means we work with many bindery operators who crease and fold some pretty heavy cover stocks. Popular folding machines were designed to fold text papers, but folder manufacturers and clever bindery equipment operators have managed to make folding of cover stocks fairly commonplace.

Read More [fa icon="long-arrow-right"]

Saddle Stitching Tip for Running Small Cards

[fa icon="calendar'] Thu, Jan 06, 2011 / by Andre Palko

[fa icon="comment"] 1 Comment

The inserter pockets on saddle stitching machines are designed to run a wide range of sizes. Problems can arise when you simultaneously run different sizes, such as a business reply card (BRC) stitched inside an 8.5 x 11” book. Getting the feeder to drop the BRC on the sword is usually simple but the trouble starts as the BRC approaches the next pocket.

Read More [fa icon="long-arrow-right"]

Printing Company Wins New Speedcreaser

[fa icon="calendar'] Wed, Jan 05, 2011 / by Andre Palko

[fa icon="comment"] 0 Comments

Congratulations to Daryn Dyer of JS McCarthy who placed the lucky order that won his employer a brand new creasing machine in our Speedcreaser Giveaway promotion.

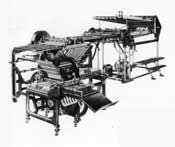
Upon hearing the news that they had won, Frank Leary, a key manager and 26 year bindery veteran with the company, immediately began brainstorming how to use the new 
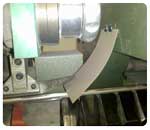
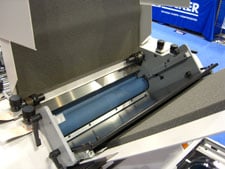
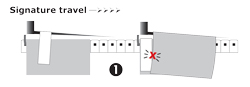
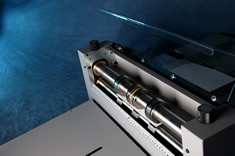
Speedcreaser® inline with a plow folder and perhaps a Streamfeeder® to create a high-volume creasing and folding machine. Never ones to let any grass grow under their feet, by the afternoon they decided to upgrade from the manual feed to the Auto-Feed Speedcreaser® with an extra EZ Fit Tri-Creaser® plus a Micro Perforator to round out this newest addition to their bindery arsenal.

Leary says they plan to install this latest piece of bindery equipment at the newly acquired Wolf Color Print in Newington CT, to help with creasing and perforating jobs in their growing digital print finishing operation.

In a recent article in the Kennebec Journal, Rick Tardiff, President of JS McCarthy, says they anticipate 30% growth for 2011. Their recent printing company acquisitions and the purchase of a new printing press are expected to fuel growth. JS McCarthy currently has a 92,000 square foot facility in Augusta ME employing about 135 people along with 30 employees in the Boston and Newington facilities.

And here's an interesting fact for an eco-sensitive world that I'll bet few printers can lay claim to: McCarthy is known for running its entire Augusta printing plant with 100% wind-generated power.
Read More [fa icon="long-arrow-right"]

Folding Machine First Aid - Tricks With Tape

[fa icon="calendar'] Wed, Dec 08, 2010 / by Andre Palko

[fa icon="comment"] 2 Comments

My first experience with folding machines could have taken place in a museum, considering the age of the bindery equipment antiquities used in my training. One was a Dexter-Cleveland (Model M shown at left) and the other was a small pile-fed Baumfolder. The Dexter was as tall as I am and loading paper was a workout that required climbing two steps to reach the infeed. My legs never let me forget a day of up-and-down on that machine. Our bindery mechanic never could figure out exactly how old the folders were but felt they dated back to the 40’s.

Read More [fa icon="long-arrow-right"]

Avoid This Costly Productivity Killer in Your Bindery or Printing Co.

[fa icon="calendar'] Tue, Nov 23, 2010 / by Andre Palko

[fa icon="comment"] 1 Comment

Thomas Edison did his best work during the night. Some people today do their best work at night too, mainly because they are interrupted so often during the day. The problem is that most of us were never taught how to fight information overload and constant interruptions. Some folks commonly confuse 'busyness' and lots of activity with productivity, even if much of that activity comes from interruptions. It might even be seen as a badge of honor. 

Read More [fa icon="long-arrow-right"]

7 Tips for Better Roll Folds on Your Folding Machine

[fa icon="calendar'] Fri, Nov 05, 2010 / by Andre Palko

[fa icon="comment"] 3 Comments

The Problem: Most popular folding machines have two to four fold plates per section, usually 3-4 in the main, “parallel” section and 2-4 in the right angle sections. Some folding jobs require more parallel fold plates than you have available. A typical example—4 parallel “roll” or “barrel” folds (5 panels) where each panel rolls over onto the adjacent panel. If you have a 6-plate machine you can fold up into #1, then down into #2, 4 & 6. What if you don’t have such bindery equipment?

The Solution: Run your right angle folding section in a tandem configuration as shown. Depending on plates available, you can fold this 5-panel job a few ways. Grab a sheet of paper and let's fold...
Method 1: use fold plate 1 & 3 in the parallel and 1 & 3 in the right angle section.
Method 2: Use plates #1 & 2 in the parallel and #2 & 4 in the right angle.
Method 3: Use #1, 2 & 4 in the parallel and #2 OR 4 in the right angle.

For a 6-panel job, use method 3 plus open one more fold plate in the right angle. So it all sounds easy on paper, right? In my experience, and judging by the number of questions we get from our readers on this topic, easy is the exception. Here are some tips which when explained will shed light on some of the problems that arise.

Tip 1: Do as many of the folds as possible in the tandem right angle section. An operator new to this type of fold will probably want to do most of the folds in the main parallel section—it just feels like there is a bit more control—but this actually results in an oblong piece that is difficult to register on the right angle. (shown in photo at right) An oblong piece has a tendency to rotate and is hard to stabilize, especially with its uneven weight distribution (3-4 sheets at the front, 1 at the tail.) Fewer folds in the first section provides you with a longer piece that’s easier to stabilize (photo above left.)

Fewer folds also means you have a thinner piece entering fold roller #1 in the right angle, with less tendency to skew. The bulkier or spongier the lead edge, the harder it will be to force in to fold roller 1. Using extra hold-downs to flatten the piece will help. I’ve also used streamers of paper attached to the parallel section to help stabilize troublesome pieces as they hit the right angle.

Which brings us to Tip #2: Elevate the right angle section so the sheet can enter the side guide partially underneath the marble holder. One reader who does a large volume of such work claims to have much better results using the 16pp right angle instead of the 8pp section. I suspect the early entry into the side guide is a big help, no matter which section is used. The side guide on the 16pp section is also on the same side as the guide on the parallel section, which may have some bearing on the results. (see tip #6 below)

Read More [fa icon="long-arrow-right"]

Hearing Loss Around Bindery Equipment

[fa icon="calendar'] Thu, Aug 26, 2010 / by Andre Palko

[fa icon="comment"] 3 Comments

What do bindery equipment, loud music, gunshots and power tools have in common?

Read More [fa icon="long-arrow-right"]

7 Bindery Tips to Improve Paper Drilling

[fa icon="calendar'] Thu, Aug 19, 2010 / by Andre Palko

[fa icon="comment"] 15 Comments

Drilling holes in paper can be easy and trouble-free…if you practice the right habits. The drilling concept is simple but like most things in bindery and print finishing, there are more factors to consider than initially meet the eye. These include type of paper stock, size of hole, number of holes, type of drill bit and coating, drilling blocks, drill bit depth adjustment, table speed and lubrication.
Read More [fa icon="long-arrow-right"]

Get Bindery Success Tips from Our Blog via Email

Our Most Recent Posts