One universal truth about producing perfect bound books is that hot glue should be handled with extreme caution. Reaching temperatures of 350-400 degrees, it will burn your skin on contact. It’s messy too, which makes it challenging to change a glue pot neatly and safely.
Unless you like the thrill of playing with dangerously hot liquids, check out this clever technique for changing the glue and cleaning the pot. This was recently sent to us by Karl Houser of BRD Printing, whose bindery operates a Muller 246 Baby Pony 5-clamp perfect binder.
According to Karl, he devised this method years ago when the machine was in his charge. Since then it’s become part of their operating procedure for changing glue. They find it to be a lot less scary and much neater than dealing with heated liquid glue.
Here is the technique, with each step listed in order. The numbers in the photos below correspond to the step numbers below.
Step 1 - Heat glue pot fully until all glue is liquid.
Step 2 - Lower pot and swing out from glue wheel.
Step 3 - Remove glue dam (2 5mm screws).
Step 4 - Suspend 2 loops of wire in the glue. Use cardboard such as an edge protector to support the loops as shown, ensuring the loops are below the surface of the glue.
Step 5 - Turn off glue pot.
Step 6 - Let glue cool completely, usually overnight.
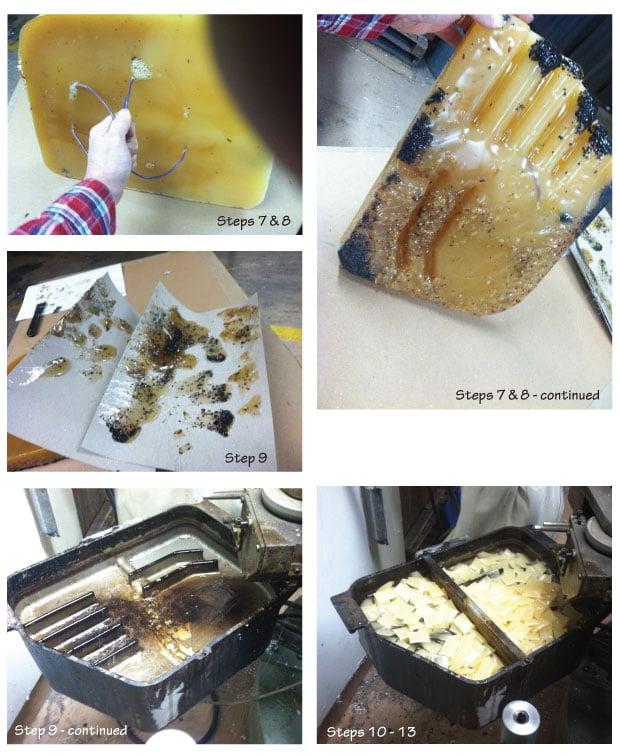
Step 7 - Turn on glue pot and watch for edges to loosen.
Step 8 - When edges of glue block released TURN OFF POT. (Without glue the heating coils could be damaged when the pot is empty.) Now lift the glue block out with the wire loops as a handle.
Step 9 - Carefully wipe and scrape any remaining glue out of pot. Use caution—the glue pot is still extremely hot!
Step 10 - Replace the glue dam.
Step 11 - Fill the glue pot and turn on heater. Add glue as the glue pillows melt, as needed.
Step 12 - Swing the glue pot into place and raise it to the correct position.
Step 13 - Check the glue level.
Step 14 - If the glue level is ok, you are now ready to go to work.
As you can see, it’s simple and neat. Yes, there still is an element of danger in cleaning the heated glue pot. But you’re not handling a large quantity of unpredictable hot liquid.
We do, however, have a word of caution for you before trying a technique like this, whether you have a Muller Martini Baby Pony or other binder. Be sure to read and understand the manufacturer’s directions. There could be reasons why this technique might not work or be suitable, depending on the design of the glue tank.
For example, you might not have as easy access to the glue tank as you do on this and various other Muller-Martini perfect binders. There might be other safety reasons that preclude use of this technique. When in doubt, check with the manufacturer or with an experienced mechanic who is familiar with your equipment.
If anyone else is using this technique, let us know below. Or if you have another technique, feel free to share it below or Contact Us here.
If you need a better way to crease your perfect bound book covers, Contact Us and let us know what type of perfect binder you have.