 “A clean machine is a happy machine,” declared by many a bindery supervisor over the years.
Keeping printing and bindery equipment clean in a dusty environment is a big challenge when so many dust gremlins are conspiring against you. Each day you have paper dust, spray powder from printing presses as well as atmospheric dust, pollen and pollutants barging in. If your bindery or pressroom is near a delivery dock, you also have road dust and dirt intruding.
Failure to keep your machinery clean will cost you time and money, often in surprising ways, and can affect your bindery equipment operation in several areas.
There are numerous shafts on folding machines, scoring machines, saddle stitchers and perfect binders. When dust collects, it prevents tools and accessories from sliding or moving as designed. Where there is movement, there is space. Manufacturing tolerances on tools can be as small as .0005" or less (that's 1/2 a thousandth of an inch.) So yes, that space is really small. But a piece of dust or pollen can be as small as .0002" or less. This means the really tiny stuff can get underneath metal components and eventually freeze the tool on its shaft.
Tables on cutters or work areas. Dust makes things harder to slide and adds to production time. If you’re cutting stock for press, dust can cause serious problems for the pressman, and he or she won’t be shy about letting you know. Dust or dirt on a work table can ruin the bottom sheet of every stack pushed along it. In that case the customer will let you know.
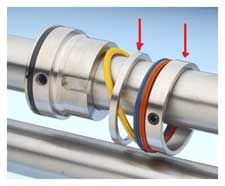
 Tools and their internal components. If there are moving or adjustable parts on or in a tool, dust can keep them from functioning properly. The rib retaining collars (photo at right) on our EZ-Fit Tri-Creaser for instance, are affected by a buildup of dust. Too much grime prevents them from sliding freely as they should.
Bearings. Small particles can get into bearings, even if they are shielded or sealed. Although the gap in the shield is tiny, so are the dust particles. If dust is allowed to build up near a bearing, there’s a good chance particles will migrate inside and cause damage. It doesn’t take much to ruin a bearing.
Moving components. As with sliding parts, any moving piece of machinery can be hindered by dust. Dust can also cause premature wear of components.
There are three ways to fight the dust gremlins. One way is to make a good effort at controlling it by using good dust collection focused on the sources. Most large presses, for instance, can easily be retrofitted with spray powder extraction systems. Waste removal systems are also available for the trimmers on stitching and perfect binding lines. They can be adapted to any bindery machine or guillotine cutter that generates a continuing stream of trimmed waste and subsequent paper dust.
The second way is to cover the sensitive machine areas when not in use. Newer bindery equipment also tends to come equipped with more noise hoods, covers and guards. These too can help keep dust accumulation to a minimum.
Even with your best efforts there will still be dust. This brings us to the third method, which is to remove the dust by either wiping it off, blowing it off or vacuuming it off. Of the three, vacuuming is ideally the best but in practice not always practical or possible. Fine powder can remain even after a heavy vacuuming, or if there are lubricants present.
Blowing with compressed air is probably the most common technique in print shops and binderies but it’s also the worst. It vigorously blows the dust and larger particles around and these can get into your eyes and lungs. It can also do more harm by actually pushing particles deeper into small openings or into electrical components. If used cautiously it can however, be great at removing dust in less critical but hard-to-reach areas.
A combination of wiping and vacuuming is probably the best. A quick swipe of the shafts with a clean rag at the beginning or end of the shift can do wonders for prevention and will keep tools sliding freely.
In our experience, it’s also a good idea to always clean a shaft immediately before you move any tools that happen to be on it. Then, after wiping the shaft, loosen the tool and move it about 1/4”. You might see a fine line of dust where the edge of the tool had been. Wipe this off and then move it 1/2” in the opposite direction. Then wipe on the other side of the tool, opposite the direction of movement. Repeat for any other tools on the shaft.
The reason for this is simple. Often there is a buildup of dust in the small opening between tool and shaft, closest to the edge of the tool. Sometimes the edge of the tool is microscopically beveled which allows even more dust to accumulate. It’s not much, but it can be enough to start causing problems if you force the tool over it.
Here’s another tip for tools or collars with threads on them. Brush and wipe the visible threads to remove all dust. Then unscrew the tool completely so that you can clean all threads that were hidden. (Compressed air carefully used here may work best in combination with brushing and wiping.) If you want to be extra diligent, remove all set screws and clean the openings.
The important thing is to do this simple cleaning on a regular basis. Threaded collars will freeze up when too much dust accumulates. If it gets to this point, you’ll probably need the assistance of a machine shop.
If you make it a habit to do a quick cleanup at the end of the shift or at the end of a job, you’ll prevent a lot of problems down the line. In most cases we’re only talking about a minute or two of time. Compared to the time lost to dust-related problems, it’s a small investment. Once it’s a habit, you’ll never have to think about it.

