
A good part of my bindery work experience included the high volume guillotine cutting of millions of little tags and labels for a printer who serviced the garment industry. These ranged from tiny cloth garment tags (you know, like the ones inside t-shirts that scratch and annoy you) to tags and labels printed on regular stock.
To spice things up a bit, there might be 40 or 50 lots on a single job, or even a single sheet, with different sizes, models, colors, fit and more. Of course each of these needed to be packed separately.
Prior to this experience my philosophy in the bindery was generally to handle something once whenever possible. It kept things moving and generally seemed to be more efficient than having to handle a lift of paper twice. In other words, if I put a lift of paper in the cutter, I didn’t take it out until the cutting was complete.
 Tag and label cutting taught me differently. I discovered that I could get tremendous increases in production by dividing the cutting into two separate operations. This 2-step process also helped with the logistics of correctly packing dozens of different lots. I’ll explain.
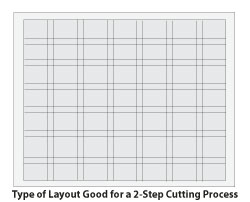
The sheet at left for instance, has 49 units with bleed. This 2-step process works best if you have two cutters that are positioned side by side, but it's not necessary. It will work with a single cutter.
First, on Cutter #1 trim all 4 sides and then trim the 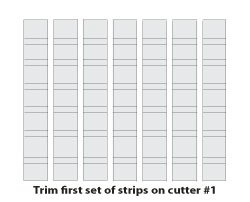 first set of strips as shown at left. In this case we end up with 7 strips. If you have numerous lots on the sheet, at this stage it might help to separate the lots in some fashion before final cutting.
Now slide these strips to cutter #2 where they are trimmed to final size. If you have only one cutter, carefully stack the strips on skids. Then after you finish the first pass of cut strips, come back and do the final trim in a second pass.
Dividing the workflow can make it incredibly faster, but there are two important considerations.
- You’ll need sufficient manpower and workspace to deal
 with the packing. You can move a surprising amount of material in a short amount of time with this 2-step technique, especially with two guillotine cutters operating side by side. But high output from the guillotine is no good if you have a bottleneck in packing.
 - Be sure to cut the same number of sheets per lift. This is trickier than it sounds. If, during the second-pass final trim, the strips from one pre-cut lift have a few more or less sheets than another lift, you won’t get even clamp pressure. This will make a mess of the final cuts. A good guillotine cutter operator can use a pad counter to keep the lifts consistent in height.
If the stock being cut is difficult to slide around on the cutter bed, consider putting a piece of uncoated cover or tag on the bottom of each lift. It helps with moving the strips as well as moving the final trimmed pieces. (Chipboard works well too but it will dull your knife faster.)
Another benefit with this technique, aside from the seriously high speed, is the ability to pull out a particular unit or units for rush shipping. You can put the other strips aside and come back to final cutting once the rush units are done.
As always, common sense should prevail. This technique is best for high volume guillotine cutting. A short run job will be faster to cut in a conventional, handle-it-once fashion.
We welcome your comments and suggestions below.