In a bindery equipment operator’s fantasy world, every sheet of paper is perfectly square, perfectly flat and all the edges are straight, from the first sheet to the last. In our real world, intruded upon by competitive pressures and the low-cost paper that comes our way, we know this is not the case. Sometimes paper isn't stored right, maybe it distorts during and after printing, maybe it's a deckle edge sheet or maybe the converter simply does a sloppy job.
Whatever the reason, all guillotine cutter operators will at some point face the impossible cutting job. In it, the job doesn't seem to register at all, no matter how well you jog the sheet, yet the print seems to register just fine to itself and to the sheet. I recall more than one job where I made the first cut and panicked, thinking I had jogged to the wrong side. (I hadn’t.) Thinking it a press problem, the pressman proved to me, despite what my eyes were telling me, that the sheet registered. So what’s the deal?
The culprit is probably a combination of two factors. The first is a variation in what is often called ‘squareness’ even though the paper that printers and binders work with is almost always rectangular. (I’ve also heard a bad sheet referred to as ‘biased’ or ‘skewed.’) A sheet is ‘square’ if all four corners each meet at a perfect 90 degree angle. It’s possible that one or more of those angles will vary slightly, and it’s possible they can vary from sheet to sheet or from one ream or carton to another.
The second factor is the sheet dimension, which can also vary in the same fashion as squareness. Paper webs can wander considerably during converting as can the original width of the webs. Final consistency in size and squareness will vary according to how many rolls are converted at once, condition of the equipment, whether edge trims are taken and whether it is guillotine cut after slitting.
Ideally the press operator will spot such a problem while loading the job and simply take a little time to trim the stock before printing, to ‘square’ it up. Sometimes the problem doesn’t get noticed until after it’s printed or as mentioned earlier, distortion takes place during or after printing.
The problem arises at the cutter (or folder) because these machines use different points for the side guide registration than the press. (The gripper edge is almost always OK.) For instance, the press side guide might be a small area 3 inches back from the gripper. When you jog it in the cutter, it may be at 4 or 5" on the guide side, and at some point you will be jogging against the entire side of the press sheet. It’s simple geometry. If the front of the sheet is for instance, .030” out of square with the back, then your sheet will be .030” off the press register. And of course if it varies from sheet to sheet or lift to lift, you see what a nightmare this can become!
 Aside from die-cutting the piece, there is a way to salvage such jobs. Bindery Success™ reader Andrew Brennan submitted this tip some time ago and I’ve used variations of the same idea to save a job or two. A word of caution: use extreme care or you can damage your machine or cutting knives if you forget to remove the cutting aids described below. If your paper cutter manufacturer does not recommend doing this, or they have an alternative solution, by all means follow their suggestions to avoid personal or machine damage and injury! Common sense and safety should always prevail.
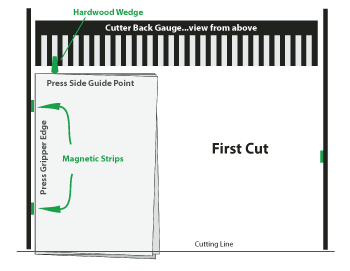
First: Construct or buy a hardwood wedge and insert it in the cutter back gauge at the exact point where the side guide would have pulled the sheet. If it’s a coated sheet you can usually see a light scuff where the side guide pulls. Otherwise, measure  the distance from your press gripper to the side guide.
Next: Place magnetic strips on the cutter side at any points where the grippers would have grabbed the sheet. Be sure both the wedge and the strips go completely to the bottom of the cutter table so sheets don't slide underneath, and you don't want them to ride above either. Jog a small lift and make your first cut.
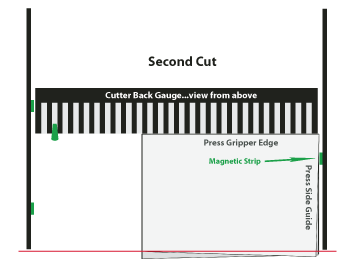
Next: Rotate the stock as shown in the second cut, to remove the tail of the sheet opposite the gripper. Now you have two square edges to work with and you should be able to finish cutting normally. The cutting register should now match the print register.
Depending on the job, if and when possible, you might carefully finish cutting each lift with the cutting aids still in the machine. Otherwise make these first two cuts, set the lifts aside and do the final trimming in a second pass. In either case, don't forget to remove all objects before continuing on to the next job.
This technique works surprisingly well, but I hope you don't have to pull it out of your hat too often! As always please share your suggestions and experiences below.

