
Ask five experienced guillotine cutter operators how to trim a sheet and you’ll probably get five different answers. So who’s right? Unless one of them signs the paychecks, it depends.
Last weeks article, 5 Signs Your Bindery’s Paper Cutting Practices are Faulty, had me on the hunt for standards and best practices with regard to cutting paper in a print shop. I can best illustrate the difficulty of this assignment by asking, “What’s the correct way to cut a sheet in half?”
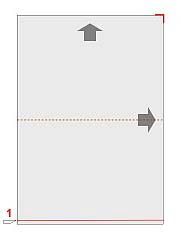 Let's start with a manufacturer. A tip from Polar-Mohr demonstrates how to halve a sheet using 2 cuts (left). Assuming it’s a 40” sheet, cut 1 would be at 39.940” and cut 2 at 19.970”. Is this method correct? It depends. Modern cutters are made to handle paper, film, acetate, cellophane, foils, PVC, rubber, textiles, pressboard, tissue paper, cardboard, cork, felt, leather and linoleum, and more. From the manufacturer’s viewpoint, this is the fastest, most accurate way to halve a sheet.
If however, you are cutting blank sheets for printing, you’ll probably disagree with this method, as do I, because it doesn’t ‘back trim’  the sheet to eliminate the dust that results on the bevel side of the cut. The better question for us is, “How do I cut a sheet in half for my printing press so that the paper doesn’t contribute to press stops, hickeys or register problems?” Any guillotine cutter rep would agree once they had details on the purpose of the cut.
Which brings us to a second method for trimming a sheet for press: any edge being cut gets cut on the back side of the knife. Make cut 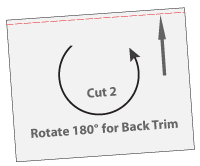 #1 as shown (right), then rotate the off-cut stock, (left) carefully jog to the opposite side and then make cut #2 to remove the dusty trim.
One note on technique #2: do NOT use a jogging block to immediately jog the sheets up against the clamped, freshly cut edge, as you would do with a printed job. Doing so will deposit a good amount of dust from the off-cut side on to the clean back trimmed edge and defeat the purpose of this technique!
Depending on the weight of your paper stock, you may need to use a third technique. Text weight stocks will puff up with air, so you may need to add a clamping step to remove air along the length of the sheet, before turning to back-trim as described in method 2.
 What if the stock you’re trimming isn’t square? 'Square' refers to the need for right angles at all four corners. When paper is ‘square’ the front and tailing edge are equal lengths, and both sides are equal lengths. Depending (there’s that word again) on the mill, a sheet can be out of square by up to 1/16” or more, which is enough to cause problems in guillotine cutting. If you get a trimmed sheet from your paper supplier, (versus sheeted stock) trimming tolerances can be plus/minus 1/32” the width or length of the sheet, guaranteeing more register headaches down the line.
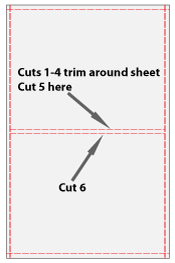
Perhaps your press will run it just fine, but guillotining a precise, finished product becomes a challenge. Never fear, we have method #4—trim all four sides of the full sheet first, then cut the sheet in half and back trim. It’s a lot more work but for a precision job it is well worth the effort. I know from experience that it’s SO much easier to do this than it is to try to salvage a botched job later on the guillotine.
Let’s complicate matters and think about cutting a sheet into 4 pieces for the press. Now there’s one more cut to be made (with back trim) along the length of the sheet. When is it best to do that? Should it be done all at once or should I separate the sheet in halves first? Once again…it depends on paper quality, equipment condition, end use of the sheet and more. We could list dozens of methods for these two simple cutting operations.
Where does all this lead us? Right back to the notion that the best set of standards are ultimately those you create for your own unique use. My technique for trimming stock on an ancient 45” Seybold cutter without hydraulics or air was much different (and more painful) than the method used on a brand new 54” Polar.
Of course, be sure to start with manufacturer recommendations and never ignore safety practices. The techniques that deliver the results you need for your operation should become operational standards. If you are experiencing problems that can be traced back to guillotine cutter techniques, then it’s time to end operator guesswork by establishing a set of best practices. Then you need to enforce them, but that’s a whole different story!
We welcome your comments and stories below!