 Creasing perfect bound book covers is difficult when the spine thickness approaches 1/8” and under. It's not hard to see why when you look at the components involved. There are simply physical limitations to how closely 2 creasing rules can be placed, even using thinner 1 pt creasing rule along with special double-crease female matrix. Rotary creasing also faces similar limitations.
Although historically perfect binding was meant for thicker books, bindery machines evolve and we all know that once a designer or customer discovers they can do something, they will! And so it was for thin perfect bound books. If you find yourself needing two closely spaced creases, whether for book covers or other types of folded pieces, try this common workaround: substitute one wide score. And if possible, use a thinner caliper stock.
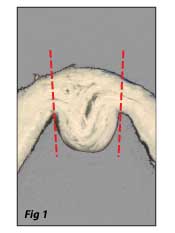
Looking at the mechanics of a crease we can see why this works. According to die-making and die cutting consultant Kevin Carey of DieInfo, "A crease is effectively a paperboard hinge...and is not a single fold but is a double fold." A creased piece of cover stock appears to be one fold but a close-up reveals two smaller hinge points, on either side of the creased bead, as shown in Figure 1. The method here takes advantage of that fact.
How do you produce this extra-wide score?
- On die cutters and letterpresses this is a fairly simple matter of using different rule widths and female channel widths. It’s an offline solution, but it has the most flexibility.
- On a perfect binder cover feeder you will be limited to the tools on your machine. Or if your Muller binder happens to be equipped with our adjustable Spine & Hinge Creaser, you have the flexibility of adjusting the female channel width as needed in conjunction with the widest creasing rib.
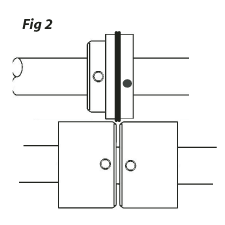
 Another offline solution with rotary tools on your folding or scoring machine is to try the widest crease available with your creasing device (for instance the yellow creasing rib in the wide channel with the EZ-Fit or Fast Fit Tri-Creaser.) You can also use a conventional OEM scoring tool and combine two or more metal scoring blades which are often available in different widths. (fig 2) Then combine this improvised male component with your choice of scoring collars, pull-out wheels or the smooth, rounded side of some old counter knives. If you’ve had your folding machine for any length of time you probably have a drawer full of folder accessories that can be recycled. Experiment with the distance between female collars and number of score blades until you get the right combination for the job.
This wide-score technique may not produce a true crease, but in this type of application it can be sufficient. Remember that we are focusing now on those two ‘hinge points’ mentioned. Since each “fold” is wrapping at a 90 degree angle around a book block, the stresses on the sheet are less than what you’d encounter by folding at a sharp 180 degree angle as in a regular fold produced on a folding machine. Lighter forces at work means less susceptibility to cracking and splitting, so the actual crease/score quality should not be as critical. Our goal is to produce a clearly defined score line to aid the fold without any cosmetic defects. If this technique gets us there, we're in good shape! It probably won't work in every instance, but it's a bindery tip that's fast and simple to try.
One final alternative: produce a double score in two passes on your folding or scoring machine. Go with a thinner crease than you might normally use, run one pass, adjust the folder's side guide to position the second score and run the second pass. It’s more run time on your bindery equipment but it might do the trick.
Your feedback and comments are welcome below!

