
Have you ever said “yes” to a folding job only to find out the piece was a miniature fold which was too small for your equipment? I have, even though I had been specifically asked if any of our folding machines could do a job that small. After it arrived in the bindery and once I got over the initial panic, I remembered there was a simple technique for folding below the minimum published size.
A miniature fold is generally classified as one that is less than about 2.25” to 2.5” or so. That happens to be right around the minimum fold limit for most conventional folding machines of the type you’d find in a commercial printing company or trade bindery. Miniature folding generally requires a specialized miniature folding machine (also called pharmaceutical folder) designed specifically for this work.
Does this mean you should turn away a printing job that is smaller than your published minimum? Not necessarily. If it’s not too much smaller than your minimum, you can probably stretch the performance envelope of your folder enough to handle the job. Note: there are some things to watch out for when you do this but I’ll get to those in a minute.
To illustrate this miniature fold technique I used a Baumfolder 714XLT folding section. The minimum published fold size is 2.25”. I pushed the fold plate stop all the way in and the resulting fold was 2 3/16”. As you can see, published minimums allow a little plus/minus adjustment.
 To get a smaller fold, we are going to extend the fold plate stops using a piece of corrugated or other thick board. You could even use a few sheets of board or cover stock glued together and trimmed to size on a guillotine. However, you need to be sure the board fits snugly inside the fold plate.
- Cut a piece of board to fit the width of your fold plate. (photo series starting upper right)
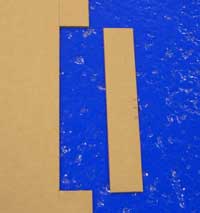
- If you’re using corrugated, use the original die-cut side as your new ‘extended’ fold stop, since it is perfectly straight and flat. (I marked the die cut side here with X’s.) If you’re
 guillotine cutting, either side will be fine since both sides are straight.
 - It helps to pick a whole number for the size of the cut board. In this case, for instance, I made the corrugated 2” wide. Then I simply added 2" to my fold size to figure out where to set the fold stop indicator. You can make it any size, but be sure to make your cut carefully and evenly. If the board is crooked, you’ll have a hard time setting your folds.
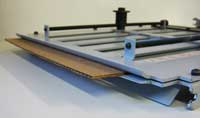
- Insert the corrugated in the fold plate. You may have to open up the fold plate mouth or loosen the bottom plate so the corrugated slides in easier. Remember to re-tighten. Or you can flatten the corrugated a bit before inserting. We want the piece to be firmly in place so it doesn’t move around as the machine runs, thereby affecting your fold size.
![]() Now you’re ready to set your fold. Since the board is tight in the fold plate it will take more effort than usual to make minor fold adjustments should you need to lengthen the fold. It’s best to avoid lengthening adjustments by making your initial, rough fold adjustment longer than needed. Then adjust your way inward. For instance I wanted 1 7/8” so I set the stops for 2” plus 2” for the corrugated (4” total.) Then I gradually moved it in inward (shorter) to get to the desired length.
Now you’re ready to set your fold. Since the board is tight in the fold plate it will take more effort than usual to make minor fold adjustments should you need to lengthen the fold. It’s best to avoid lengthening adjustments by making your initial, rough fold adjustment longer than needed. Then adjust your way inward. For instance I wanted 1 7/8” so I set the stops for 2” plus 2” for the corrugated (4” total.) Then I gradually moved it in inward (shorter) to get to the desired length.
If you find you need to adjust outward (longer) you might need to pull the plate out and move the corrugated by hand.
 Of course if you want to get fancy, you can attach the board insert to the fold stop with tape or maybe even clips. To do this you need to ensure the board is free enough to move but not so thin that the paper will slide over or under the board, causing a bad fold.
In our Baum 714 example, I easily managed to set up 2 folds, accordion style, at 1 7/8”, a full 3/8” below the published minimum. There was still plenty of room to get even smaller.
What to Watch Out For
Whenever you push the performance envelope of a folding machine, it’s a good idea to walk yourself through the entire job. Just because we can get the folds smaller doesn’t mean we can do every other part of the feeding and folding operation with a smaller sheet. Here are some other factors to consider.
What’s the minimum size sheet you can actually feed? If you can’t feed it you can’t fold it. Running a small job two or three up can help with this problem. Maybe you can use another feeder with a right angle section. Perhaps you can feed it by hand if it’s a short run. Just be sure you know what you’re getting into!
What’s the minimum size sheet you can register on the infeed table or the cross carrier? In our mini accordion fold example running on our 714 right angle, we can register a 3-panel job that folds to 1 7/8” but not a 2-panel (4 pager) that folds to that size. That’s because 1.875” X 3 = 5.625” long (OK to register) while 1.875” X 2 = 3.75” long (too short to register).
Will your job need to be slit on the folder? In order to slit successfully, the final folded piece has to be big enough to be gripped by the pull out wheels on the slitter shaft before it leaves the last fold rollers. If it’s smaller it will be impossible to cut consistently. If your miniature fold is too small for this, you might be able to do it on a guillotine cutter or another slitting machine. Just be sure to test the process.
Will the folder’s delivery be able to handle such a small piece? It may seem like a trivial item, but it’s not, especially if you are doing a big quantity. (Go here to read a related article with tips for smoother operation of your folder’s delivery.)
So while it is indeed possible to fold some pretty small pieces on a regular folding machine, be sure to walk yourself through the job from beginning to end. If it’s beyond your scope, call a trade bindery that has the miniature folder to handle this work.
But if you find yourself in a moment of panic and just need to stretch your capabilities a little, this technique could come in handy. It’s worked for me over the years!
Please share your mini folding stories and suggestions below. If you like this article, use the social media buttons above or at left to share with your colleagues.