
Saddle-stitched books often need to be folded in half (after stitching and trimming) for mailing purposes. Such soft folding or re-folding is a tricky process when the fold is perpendicular to the spine, especially if you don’t have a knife folder to do the job and you’re trying to get by with your buckle folder. Shops that specialize in this type of bindery work either have equipment set up to work in-line with their saddle stitcher or have off-line bindery equipment modified for the task.
The physics of such a job works against you in a few ways.
- One side of the piece is trimmed and open (fairly flexible) while the opposite side is closed on the fold and stitched (fairly rigid.) The stitched side will resist folding much more than the open side, creating an imbalance in forces required to make an even, square fold. Just take any flat stitched book and gently try to fold it in half by hand…you’ll instantly feel the difference.
- Feeding a pile or stream of stitched books is a chore and you probably will be limited to feeding with the stitched side as the leading edge.
- On thinner 8pp or 12pp books, the stitches can start to pop out or leave an unsightly impression especially when running on a buckle folding machine. Visualize the process: you’re forcing a flat, rigid stitch in opposing directions around the fold rollers while applying pressure. Thin papers may not be able to contain the stitch.
 Here are five tips to improve your re-folding project.
1) Use the saddle stitcher’s cover feeder to do the re-folding. Feeding is continuous, there is usually a score wheel available to help and pressure around the stitches is probably not an issue.
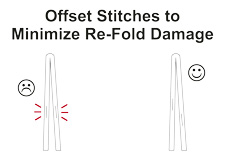
2) If you don’t have free time on your stitcher and must use a right-angle unit from your buckle folder, try repositioning the stitches off-center. (illustration upper right) When the book is folded, the stitches won’t overlap, thus reducing tearing or even loss of stitches around the stitch area.
3) Pre-score the books along the re-fold line during the signature folding process. Instead of trying to score the books on your folder or other bindery equipment after stitching, lay down a strong score line before stitching. Be sure to allow for head and foot trim and be certain that the scores on multiple signatures line up with each other. The advantage to pre-scoring is that you can usually get a much stronger score with multiple signatures, and registration accuracy is easier to achieve.
4) Use the bottom (#2 or #4) fold plate. Set fold roller calipers to absolute minimum pressure needed and remove all pressure from the last fold roller.
 5) Get creative with other feeders available in your shop, or look at buying one. Many of our customers use Streamfeeders®, Multifeeders® or similar feeders from other bindery equipment to run in-line with a right angle section. Since this type of feeder is often designed to feed bulky, unusual items, it’s much easier than trying to use the folding machine feeder. In the photo at right, the feeder was wheeled from a tabber to run in-line with an MBO right angle. With this type feeder you can also feed stitched and collated sets into the folder.
Of course if you don’t do this type of work on a regular basis, outsourcing to your local trade bindery is the easiest way to handle the job. Plus you can count on your trade shop for expert guidance in planning the job and understanding the limitations. But if you find yourself needing to finish the job in-house, these tips should help ease the pain.