
There are some advantages to learning to operate folding machines on an obsolete model. Yes, I know youngsters in print finishing would be horrified at the thought of an education on anything less than a fully automated machine. But the experience gave me bindery troubleshooting skills and machine knowledge by forcing me to learn how everything worked.
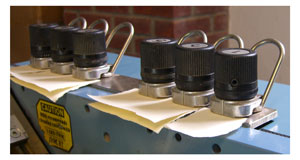 The old folders that “trained” me were a Baumfolder of unknown vintage circa the mid-1900’s along with a Dexter of even earlier vintage. This was a time when ALL the fold roller pressures were calibrated, by hand, for every job. There was no “gap set” feature. (photo at right) You learned to set pressure fast and accurately, one roller at a time, every roller, every time.
Sometimes we could take shortcuts, skipping some rollers. But these were unforgiving machines with all-steel rollers that hated coated stock. If you didn’t set them precisely, they would spew a few mangled sheets to let you know you weren’t quite done with your setup!
Of course today’s modern floor-model folding machines all have some sort of gap set feature. I remember the gratitude I felt the first time I worked on such a folder. What a pleasure it was to simply insert the appropriate number of sheets in order to set the pressure. It was a HUGE time saver. But even with the use of gap set technology, there are some gremlins lurking in the background. This one has to do with inconsistencies in fold roller pressures.
Here’s a fast and easy test to prove you can’t just assume everything always works the way it should. Ultimately this could be a shortcut to avoid a lot of unnecessary troubleshooting time.
First, calibrate a fold roller according to OEM directions. To avoid confusion, let’s clarify the difference between calibrating a fold roller and setting the fold roller. Calibrating refers to the manufacturer’s initial setup procedure for adjusting the fold rollers. Setting refers to the individual job setup procedure in which you insert sheets into the gap sets for the job you are running. The idea with the gap setting mechanism is of course, that once the rollers are calibrated, you should always get the same pressure no matter how many sheets (within reason and machine limits) are inserted.
To calibrate an MBO folding machine you put one sheet of a light stock such as 50# offset/20# bond in the gap set. Then with a strip of the same paper, check the roller pressure and adjust as needed until there is just a slight drag. The pressure should be even all across the fold roller.
Now for the test: put 8 sheets of the same paper in the gap sets. Check the fold roller pressure using 8 strips. In theory, there should be a light drag. In reality I’ll wager the pressure is far too tight. We did this simple test on our rebuilt MBO B123 right angles resulting in too much pressure on the paper in every case and on different rollers.
It’s easy to see that this could cause significant folding problems such as wrinkling, skewed cutting or perforating, or bad folding. An operator who did everything by the book could be mystified and repeatedly have to re-set fold roller pressures. And a supervisor who’s not aware of this little ‘gotcha’ might become unjustifiably annoyed at an operator for setting up their machine ‘incorrectly’.
However, if after calibrating you insert 2 to 4 sheets in the gap sets, you’ll probably find the resulting pressure is acceptable. What this all means is that you may want to consider calibrating the rollers using the minimum number of sheets that roller is likely to see, especially if it’s 4 sheets or more.
For instance, if you run a lot of right angle signatures such as 16 pagers, then in the 16 page right angle unit you’ll want to calibrate fold roller #1 using 4 sheets. You’d probably be safe calibrating the rest of the rollers in that unit with 4 sheets too. But if rollers 2 through 5 always see 8 sheets, then use 8 sheets.
Obviously if you handle a lot of different folding jobs on different weights of paper, you might just want to calibrate things normally by using 1 sheet. Then be aware that you’ll need to double check the roller pressures if the roller will be handling 4-6 sheets or more.
 Not every folding machine will necessarily suffer from this minor variation in roller pressures. But give it the quick test above and if needed, then add this slight modification to your standard operating procedure.
If you happen to have an antique folding machine hidden in some dark corner of your shop, just for fun try running it, preferably with a live job. Even if you learn nothing, you’ll definitely gain an appreciation for modern folding technology!
Thanks to Dave Double, owner of Double Equipment, fellow bindery ‘old timer’ and veteran mechanic, for his significant contribution and feedback on this topic.
