
You might not realize it but there are two completely different meanings to the word “creasing” as it relates to bindery work. The definition we most often use here relates to the creasing tools we sell such as the Tri-Creaser®. We talk about what that definition and why it’s desirable in more detail here .
Various dictionaries refer to the other usage as “a line or mark made by pressing or folding.” In print finishing you also hear it called “wrinkling”. Of course this is desirable.
 Yet when someone asks, “I’m having a problem with paper creasing; how do I fix that?” the answer is, “It depends.” Like headaches and print finishing problems, there can be many reasons you have the symptom.
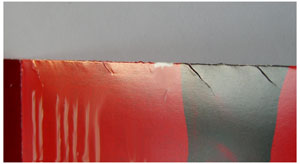
Such creasing or wrinkling often happens while paper travels through a folder or a pressing roller in a stacker. The photo at right is a good illustration of an undesirable paper crease or wrinkle.
So let’s dig a little deeper. If we break down the question by looking at four different folder operations, we can narrow things down a bit. Then we can look at some possible fixes for each.
Parallel Folds
In this case we’re folding a single sheet one or more times with all folds parallel to each other. Several items can cause paper wrinkling.
The paper could be buckling as it enters the rollers. As the roller flattens the sheet, it leaves little creases along the tail. (Note: The fact that a sheet is buckling doesn’t mean it will wrinkle.)
Too much skew on the side guide can cause a large buckle. Another cause is excessive use of steel marbles or incorrect placement of marbles in the side guide. Your folder manufacturer has suggested setups for various weights of paper, but you will likely have to experiment too.
Incorrect fold roller pressure is another culprit. You can narrow down the problem roller by looking at which panels have wrinkles. This is why it pays to understand how fold rollers work. Other causes include intermittent feeding, a lack of paper smoothers, worn transport belts, or wrong folder speed. You can read more about all these issues here.
 Creasing or Scoring a Single Sheet
Here we’re using both definitions at once. In this case we’re running a single sheet through the rollers before it folds. We add a crease to prevent fiber cracking and to help the fold take place.
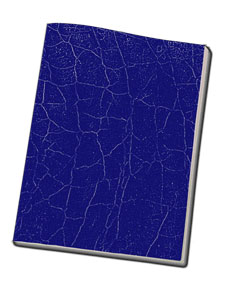
If the paper is too heavy, you might get a bad curl and tight “creases” or cracks on the surface of the sheet. It’s also called the ‘alligator skin’ effect because that’s what it resembles (photo at right). This article talks about how to reduce curl which in turn minimizes the risk of alligator skin. We discuss an alternative method here.
Broadside folds and Maps
Here we’re talking about right angle folding. Such a fold might have one or two folds in the first parallel section combined with one or more folds in the right angle section. This creates air pockets within the folded brochure. If excess air can’t escape, wrinkles are the result.
One common scenario is the 11x17” which folds once to 8.5x11, then into the right angle for two folds down to a #10. During the last fold it’s easy for air to get trapped along the head of the inside panel,  resulting in creases along the closed edge. Remember, there are limits to what your folder can do.
With this type of work you want to be sure to use good, strong scores, positioned precisely. This makes it more accurate and minimizes required fold roller pressure. But if a designer has gone crazy by specifying a cover stock for a map fold, well it’s time for a little chat. The wrong paper with the wrong imposition will exceed your folder’s capabilities. That’s when wrinkles start to appear.
Signatures
Here we’re talking about folded pieces that make up a saddle stitched or perfect bound book. There are numerous types of parallel and right-angle folds used in signatures. The advantage with signatures is that you can put a perforation along any fold that gets trimmed. This releases trapped air.
Two common examples are 16 and 32 page right angle signatures. In the 16 page signature, you perforate along the head to release air in the subsequent two folds (diagram at right). An extra benefit with a perforated head is that you don’t need to score the spine for the final fold. We talk about that in more 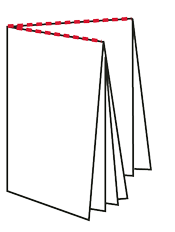 detail in this article.
In a perfect bound 16 page sig, both the head and the spine can be perforated since both are removed during the perfect binding process. In a 32 page right angle signature you can do 3 parallel accordion folds in the first section and then perf down the middle of the sheet. This allows air to escape in the final two right angle folds.
Sometimes a wrinkle is no fault of the bindery equipment. I confess there have been times when I’ve searched at length for the cause of a paper wrinkling problem only to find out it happened on press. I soon became good at distinguishing between a press sheet wrinkle and a folding machine wrinkle!
If you’re new to folding, these categories can help you get a grip on fixing and preventing paper wrinkling problems. Other print finishing equipment such as die cutters, letterpresses, laminators, re-winders, and sheeters are just as eager to try your patience with wrinkling. With a little deliberation you can root out the problem on any type of bindery equipment.
If you still have questions, please feel free to ask below in the comments section. Or use the Contact Us form. Or share your own story below about fixing a wrinkle problem.
