
 Have you ever produced a saddle stitched or perfect bound book only to later find a mark hidden somewhere inside? If you’re lucky you find it during the actual folding and binding production and you track down the culprit to eliminate it. Otherwise all you can do is hope the customer doesn’t notice. This type of finishing problem is often associated with matte and dull-coated paper.
Matte papers are notoriously easy to scuff. Because of their very low abrasion resistance, you can lightly run your fingernail across a matte sheet and a shiny streak will appear. Matte’s cousins, the slightly glossier “satin” and “silk” and other semi-mattes are difficult to handle but not quite so bad.
Much to the dismay of bindery equipment operators everywhere, matte stocks have become popular. Their readability and the soft, diffused appearance of the printed sheet are much different than that of regular glossy sheets, making them popular with designers. And depending on the finishing requirements of a matte job, most experienced folding and stitching machine operators have accepted the fact that without proper precautions, the job will likely scuff or scratch in particular places on certain machines.
The good news is that there is much that can be done to eliminate marking and scuffing problems with matte papers. First, there are important preventive measures to take primarily in the design and printing phase. Then there are the workarounds and alternate operating practices we devise in the post-press phrase, otherwise known as the “What the heck are we going to do?!” phase.
There is an excellent 24 page technical publication from Sappi Paper, Processing Matt Papers, which you can download here on their website. According to the authors, one of the best things you can do to avoid problems in post-press is to first print the job correctly in the press room. The authors have a diplomatic way of outlining the battle between producing print jobs under "positive conditions" and "negative conditions."
In short, negative conditions are those daily pressures that force the pressroom to use a mix of compromises in order to get the maximum work done in the shortest time possible. But inks, fountain solution pH, spray powders and drying times that work for most gloss or uncoated papers will likely not work so well for matte papers. Processing Matt Papers contains photos and an in-depth study which dramatically illustrates the striking difference between jobs printed positively and negatively.
It will come as no surprise to bindery veterans that what they illustrate as jobs produced under negative conditions are what we are accustomed to seeing on a regular basis. This is probably even truer for those of you who work in trade binderies. In other words, printing matte paper is a whole different animal in the pressroom. If the specific print requirements of the paper aren’t met, there will be problems in post-press.
So what can we do once the job reaches the bindery department, whether it’s printed correctly or not? The challenge is to eliminate the marking problem without interfering with the proper functioning of the bindery equipment. Here are four tips to help with your marking problems:
1) Keep your machine clean. It’s a good habit to always keep your equipment clean and when you start folding and binding matte papers, you’ll find out why. Matte is notorious for picking up dust, ink, and dirt from anything with which it comes into contact. It’s much easier to keep a machine clean than to do a thorough cleaning once a problem appears.
The flip side to this is that matte paper can be good for cleaning out your machine. For instance, if you’re running a saddle stitcher or perfect binder, there are dozens of hidden, hard-to-clean places where dirt likes to hide or stray drops of oil like to live. It may not show up until a matte job is running. I used to run a few hundred waste signatures through the machine to help with cleaning. It’s not perfect, but it can get you running without tearing off all the guards.
2) Examine the job carefully at each production step. You should have a second set of eyes look at any job before running, at each step along the way. But it’s even more critical with matte papers. Spend a little extra time looking at every page of the signature or brochure. Once you start running be sure to examine sheets from the delivery stream to be sure nothing is marking during delivery or handling. Things you take for granted, such as a string tier or banding machine can mark a sensitive paper.
3) Learn your machine. Once you find a mark or scuff, you have to track down where it’s occurring. This can take time especially if you’re new to working with this type of paper. Once you find the source, try to eliminate it with the standard machine components or adjustments. For instance, on folding machines you might need to use plastic marbles instead of the steel. If your stitcher or gatherer’s feeder pocket is bottom fed, you might have to run smaller stacks with more air.
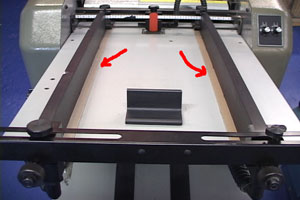 4) Learn to use workarounds. To illustrate, here’s one for saddle stitcher feeder pockets that helps eliminate a common saddle stitcher scuffing problem. I’ve seen paper, plastic strips, corrugated cardboard, and shrink wrap film attached to folding, stitching and perfect binding machines.
Tape is another essential resource. The slipperier it is (low coefficient of friction), the better. PTFE glass-cloth tape is a readily available one which you might already have in your shop. It’s the type used on shrink wrap machines. Not only is it resistant to heat, it is extremely slippery and resistant to inks and adhesives. The photo at right shows it in use to help with marking on a feeder.
Each piece of bindery equipment presents its own unique challenges to running matte papers. Don’t be afraid to get creative. You’ll be a hero when you salvage that impossible job!