
Here’s an ingeniously simple tip on how to eliminate marking problems on a Horizon SPF10 stitcher and folder. It could work on other similar machines too. If you work in a bindery department, it’s safe to say that eventually you’ll have a job with a marking problem, especially on coated, matte or dull coated papers. It doesn’t matter what kind of collator, stitcher, folder or other bindery equipment you’re running. We’re always stretched to the limits of machine, material and labor!
This technique was sent in by Patty Hartmann of The Goodprinter, who works with a Horizon SPF10 stitcher and folder running inline with a Horizon collator and trimmer. These popular machines take flat sheets of paper, including text and cover stocks, and collate, stitch, fold and trim in one seamless operation.
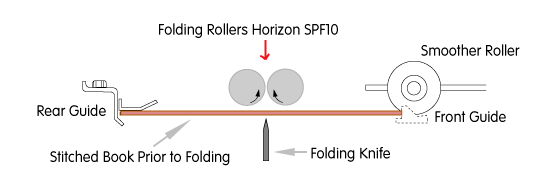 Hartmann says that for years they avoided running gloss or matte coated paper through this machine due to a marking problem. When a book with coated covers would pass through the steel fold roller section, (diagram shown above) it inevitably caused marking or scuffing. There was no known mechanical solution to the problem.
Whenever they faced such a job, the only way they found to prevent the marking problem was to insert and stitch a slip sheet on the outside of the cover and inside wherever marking was occurring. When the job was complete, they manually tore out all slip sheet pages from the books. As you can imagine, this is quite tedious and not exactly a billable item!
 One day Hartmann decided to tape a sheet of paper around the two fold rollers. Just like that, the marking problem disappeared completely. Since then they’ve never had a marking problem with their Horizon.
The simple technique is outlined below and we’ve included a brief video to show exactly how easy it is to implement.
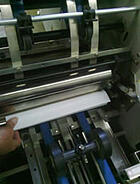
- Tape a sheet of 8.5 x 11” 30, 40 or 50# bond to the front fold roller. Carefully roll the sheet completely around the roller, then seal the seam with tape. (2 photos at right) Be sure to turn off power to the machine.
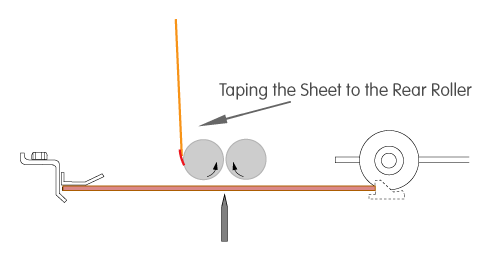
- Tape a sheet of the same paper to the rear fold roller. Be sure to follow the direction of rotation as shown in
 the diagram. (diagram below) Hartmann says she doesn’t need to seal the paper seam on this roller. It will run as shown as long as the sheet is attached in the proper direction.
 - Adjust the fold rollers for book thickness as needed and you are ready to run...without marking!
One of those unwritten rules of printing and bindery work should be “If a new piece of equipment is installed in your department, you will immediately have to run a job outside the machine’s performance capabilities.” Once you relax and accept that fact, it’s a lot easier for those out-of-the-box ideas to pop into your head!
Thanks Patty for submitting your tip. We hope it's a big help to anyone else struggling with this marking problem on their Horizon stitcher-folder or other machine. As always, feel free to share your experiences and suggestions below.
Click the Bindery Video Tip Below to Watch