
If you work in a trade bindery or print shop handling a lot of book work, by now you probably have your own bag of tricks for folding 32 page signatures. If however you’re not accustomed to running them on a regular basis, you might encounter a bit of a learning curve.
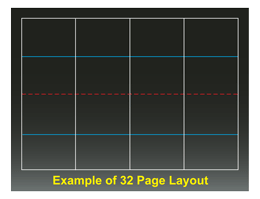 Whether you can run a 32 page signature or not depends on the size of the book, number of pages and the limitations of your press and bindery equipment. The illustration here shows a typical layout you’d find for a 5.5 x 8.5” book that could be produced on a folding machine roughly 23.5” wide or better.
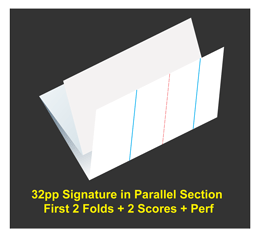
It requires a double parallel fold in the first section, then a double parallel fold in the right angle section. (Note: space for the lip and trim is not shown for the sake of clarity.)
By the time this type of signature leaves the last fold roller you are pushing 16 sheets of paper. On a 50 or 60# book stock, that’s about .064” thick. In other words, you might have to do a little convincing to make the sheet do what you want it to without it fighting back with wrinkles, dog ears, bent corners or poor registration. Here are a few suggestions to make the folding job easier.
 One: make sure the first two folds in the parallel section are consistently accurate. (left) If this is not close to perfect, you’ll struggle throughout the job.
Two: perf the center of the sheet as shown to release trapped air during the right angle folding. Without a perf you’ll likely experience plenty of wrinkling. Start with the perf blade you use for 16 page signatures (usually a 16 or 12 tooth blade on machines with 35mm shafts.) Don’t hesitate to experiment with different blades. After all we are slicing through 4 sheets of paper so performance can vary substantially with the slightest change in perf blade configuration.
Three: use 2 scores as shown, (lower right) one on the upper shaft and one on the lower, with the “outside” score wider than the inside score. If you’re using metal scores, use the widest one you have or combine 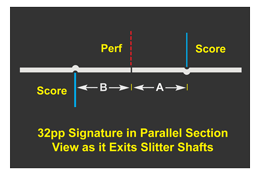 two thin ones to make the single wide score for the outside fold. Both scores should be as strong as possible without ripping the sheet. If you’re using a Tri-Creaser then use the thickest creasing rib or O-ring insert in the widest channel. If you have wet scores available and you’re running uncoated stock, try adding them to the mix.
Four: make distance “A” just a hair less (that’s a scientific term) than distance “B.” The combination of thinner score and smaller distance lets the inside panel nest perfectly and fold smoothly. You’ll know it when 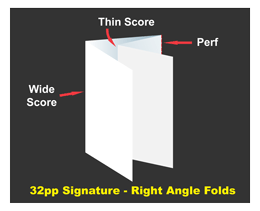 you see it. If “A” is too long, your last fold will be difficult if not impossible.
Five: check that the perf and score register (as well as the folding) is perfectly accurate. If not, fix it before continuing on to the right angle. As with all right-angle folding you want to be sure that all operations in the parallel section are always as close to perfect as possible before proceeding to the next folding sections.
Six: for the configurations shown here, set up the right angle using fold plates 2 and 4. You don’t have to use these plates but for a folding job this thick you’ll probably have fewer problems.
Seven: if you encounter ‘dog ears’ on the perf, try different perfs and/or open up the mouth of the fold plate if that feature is available. Or you can carefully pull right angle fold plate #2 about 1/16” away from the plate stops on both sides. Lock the plate in place and then move the fold stops in 1/16” (shorter) to compensate for the position change.
If you can run the signature with the original press guide and gripper intact, that’s another big help. As with all things bindery, a little experimentation is always a good thing. If you’re new to 32 page signatures or similar work, a little patience in the beginning will pay off quickly.