
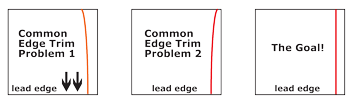
If you struggle with edge trimming on your folding machine, here's a tip that could 'straighten' out your problem.
First, a little background about the cutting tools that fit your folder. Most folder manufacturers supply rotary cutting tools for specific applications and weights of paper. There are center-trim kits, edge-trim kits, upper waste deflectors, lower waste deflectors, thin blades, thick blades, spacers, gripper bands and more. For an all in one solution with superior quality, check out our Technifold Multi Tool (which also has micro perforation capability built in) !
 For instance, a center-trim kit, usually supplied with thin cutting blades, probably won't suffice for an edge-trim job on a 16pp signature printed on 100# text. But they might have another kit or set of blades designed for edge trims. So start with the manufacturer-recommended tools before you take it to the guillotine cutter!
If you’ve done all your homework, tried all the right tools and still find that the edge trim refuses to run straight, no matter what you do or what tools you use, there are alternative methods. Here is one tip that we've found to be effective on a wide range of folding equipment. We'll talk next week about another technique and we’ll also include details about our Multi Tool, which uses a similar version of this method for edge trimming jobs and which also provides a high-quality cut for those jobs that require a guillotine-like finish.
 The Technique
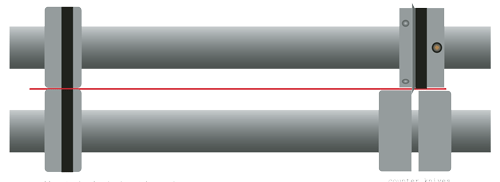
In this example we are trimming off the right hand side of sheet (as you look into the folder.) Reverse the setup for the left side of the sheet.
- Place your edge trimming collar (the blade holder) on the top exit roller, first making sure that the flat side of slitter blade is facing inwards, away from the waste.
- The rubber gripper disc must be on the right side of the slitting blade (the beveled side)
- Align the collar into the correct position and secure tightly.
- Slide two straight edge counter knives (cutting bosses) on bottom shaft, with the cutting edges facing each other.
- Place one counter knife on each side of the slitter blade.
- Secure left counter knife snugly against the slitter blade. (Always be sure your slitter shafts are correctly locked, with zero side-to-side movement, before positioning any tools on the shafts!)
- Secure right counter knife approximately 1 mm away from bevelled side of the slitter blade.
- Attach the OEM upper waste deflector in front of the rubber gripper band as normal
Lastly you have the crucial part of the procedure: The fewer pull-out wheels (gripper bosses) that you use directly to the left of the slitting blade, the better the result. Too many pull out wheels and the curved cut will return. It is not unheard of to have pull-out wheels on the other side of the sheet only, with nothing next to the cutting knives, as shown in the diagrams.
You’re now ready to check a sheet.
- If the cut is straight (no curve), you’re all set.
- If it’s straight but at an angle on the sheet, you can easily adjust the angle using this technique (Click Here for the FAQ section with details.)
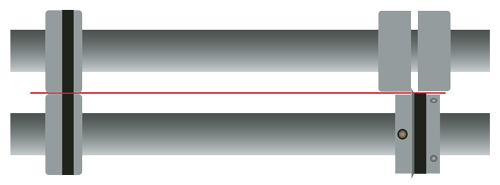 If the cut is still curved, then try reversing the setup with the cutting knife on the bottom and counter knives on the top (illustration) assuming that your blade holder can be configured as shown.
Stay tuned next week for more tips on edge trimming and as always, we welcome your suggestions, comments and experiences below.
