
Whether you or your folder operators are industry veterans or are setting up your first folding job, here’s a topic worth more than one look. We’ve discussed various aspects of slitter shaft maintenance a few times (see blog links at the end of the article) yet the type of questions that come up tell us it’s an item often overlooked when troubleshooting.
Some Symptoms of a Slitter Shaft Problem
- Slight ripping or nicking on the leading edge of a perfed or scored sheet as it passes through the slitter shafts.
- You can’t get proper depth on the crease, or a consistent depth, even as you apply more pressure.
- You have trouble getting a consistent micro perf (using an anvil style perforator.)
These issues are sometimes caused by incorrect pressure setting on the slitter shaft calipers. If pressure adjustments are not fixing the problem, then it’s time to check the bushings and bearings that house the shafts. Here’s a simple procedure that only takes two minutes but can save you lots of heartache. Yes, there can be other items that contribute to the problem, but this is an easy one to rule out.
The Procedure
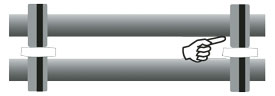 Put a piece of 100gsm stock (100# text or so) into each of the slitter shaft calipers and push a set of collars (pull out wheels) out to each side so they are close to the ends of the shaft (drawing at right.) Lock the collars, and then adjust the calipers so there is a light, even drag on the sheet when gripped by the collars. Now insert one strip of the same stock into the collars on each side.
- Place your finger underneath the top shaft at one side of the shaft and gently apply upwards pressure. If the sheet now becomes slack this is an indication the bushings or bearings are beginning to wear, and you should go to step 3. If there is no slack, your bushings or bearings should be in good shape and you'll want to repeat this test on the other side of the shafts.
- The next step is to place 2 sheets between the collars and once again gently try to raise the top shaft. If there is no slack, you can probably run your jobs but should plan for a shaft tune-up soon, especially if you do a lot of micro perforating. If you can put 3 sheets between the collars, apply pressure to the top shaft and the sheets become slack, this means the bearings or bushings are too badly worn to give a high quality crease or micro perforation. Repeat this procedure on the opposite side of the shaft even if the first side appears good. If only one side is bad it can create problems.
Why This Becomes a Problem
Although you set the calipers correctly, when a sheet of stock runs through shafts housed by worn bearings, the top shaft lifts up so there is insufficient pressure pushing the insert into the paper stock. The operator thinks, “let’s add more pressure.” This in turn makes a deeper crease (or perf) but it also makes the leading edge rip slightly as the device has now been placed closer together--but only temporarily. Because of wear, the lead edge of the sheet will push the shafts apart so what you get is a good crease over the balance of the sheet and a nick at the lead edge.
If this quick folding machine procedure indicates excessive wear, don’t hesitate to have your mechanic check it out. The payoff in increased folder productivity and quality can be substantial.
Be sure to review the links below for additional maintenance and operating tips related to folder shafts. Some of these items seem too simple to matter, but I learned the hard way they can make a huge difference if neglected!
Bindery Equipment Shafts - How to Prevent Damage