
 The Problem: Most popular folding machines have two to four fold plates per section, usually 3-4 in the main, “parallel” section and 2-4 in the right angle sections. Some folding jobs require more parallel fold plates than you have available. A typical example—4 parallel “roll” or “barrel” folds (5 panels) where each panel rolls over onto the adjacent panel. If you have a 6-plate machine you can fold up into #1, then down into #2, 4 & 6. What if you don’t have such bindery equipment?
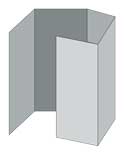
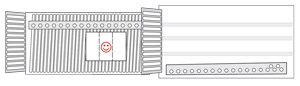 The Solution: Run your right angle folding section in a tandem configuration as shown. Depending on plates available, you can fold this 5-panel job a few ways. Grab a sheet of paper and let's fold...
Method 1: use fold plate 1 & 3 in the parallel and 1 & 3 in the right angle section.
Method 2: Use plates #1 & 2 in the parallel and #2 & 4 in the right angle.
Method 3: Use #1, 2 & 4 in the parallel and #2 OR 4 in the right angle.
For a 6-panel job, use method 3 plus open one more fold plate in the right angle. So it all sounds easy on paper, right? In my experience, and judging by the number of questions we get from our readers on this topic, easy is the exception. Here are some tips which when explained will shed light on some of the problems that arise.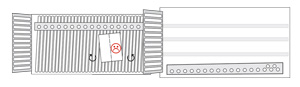 Tip 1: Do as many of the folds as possible in the tandem right angle section. An operator new to this type of fold will probably want to do most of the folds in the main parallel section—it just feels like there is a bit more control—but this actually results in an oblong piece that is difficult to register on the right angle. (shown in photo at right) An oblong piece has a tendency to rotate and is hard to stabilize, especially with its uneven weight distribution (3-4 sheets at the front, 1 at the tail.) Fewer folds in the first section provides you with a longer piece that’s easier to stabilize (photo above left.)
Fewer folds also means you have a thinner piece entering fold roller #1 in the right angle, with less tendency to skew. The bulkier or spongier the lead edge, the harder it will be to force in to fold roller 1. Using extra hold-downs to flatten the piece will help. I’ve also used streamers of paper attached to the parallel section to help stabilize troublesome pieces as they hit the right angle.
Which brings us to Tip #2: Elevate the right angle section so the sheet can enter the side guide partially underneath the marble holder. One reader who does a large volume of such work claims to have much better results using the 16pp right angle instead of the 8pp section. I suspect the early entry into the side guide is a 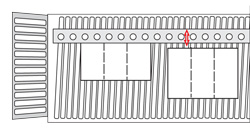 big help, no matter which section is used. The side guide on the 16pp section is also on the same side as the guide on the parallel section, which may have some bearing on the results. (see tip #6 below)
Additionally, he removes some of the marbles at the entry to the right angle side guide and avoids excessive use of steel marbles.
Although the 8pp section is more compatible in height, the partially folded piece is literally dropping down on the cross carrier, and you need to pull this somewhat unstable, partially folded piece as much as a few inches in order to register underneath the side lay. (photo above left) 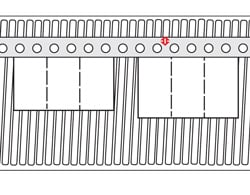 This takes time, which might run out before you hit fold roller #1. The result is a poor, inconsistent fold. So take some time to review your equipment and look at ways to get the sheet under the side guide as soon as possible to reduce the pull distance (right.)
Tip #3: Pay attention to roller tension, it’s especially important in the right angle. You need enough tension to drive the sheet into the next plate but not so much as to mark or wrinkle the bulky part. Some operators like to use Tesa® or Gaffers tape on the appropriate fold rollers. It allows you to loosen the tension somewhat while still maintaining enough grip to drive the sheet, more than you might be able to accomplish with plain rollers.
Which bring us to Tip #4: slower is usually better in the right angle. Picture the fold rollers opening up wide to accept the fat leading edge. It then has to close up in a split second to drive the single sheet. Slower machine speed gives it that extra few milliseconds to close the gap and drive the sheet in time. You might see exceptions to this rule, but the general experience is that slow wins the day.
Tip #5: Use a strong press or die score on the last one or two folds, even with text weight papers. We’re pushing the edge of the performance envelope with this type of fold, so every little bit of aid helps.
Tip #6: Fold rollers on most modern folding machines wear from the center out when running the usual mix of paper sizes. For a large run, fold the job 2 or 3 up, tie in bundles with chipboard or waste paper on the bottom, and bring to a guillotine cutter for trimming to final size. Folding a wider sheet in this manner lets you take advantage of the better grip toward the edges of the rollers. For a short run, offset the tandem right angle and fold the job closer to the side, using the less worn section of the fold rollers. It might be enough to make the difference.
Tip #7: If you are trying a fold like this for the first time, don’t cut the entire job, especially if it’s a long run. Run a test batch first. This type of job can be a real challenge because of all the variables. Grain direction, ink coverage, paper weight, quality of crease or score, folding machine condition and operator skill all conspire to make it an interesting day with this type of job.
As a few readers wrote, this type of job can run like a dream one time and like a nightmare the next, with no apparent changes to paper, procedure, etc. We hope these tips keep you in dreamland! Operating bindery equipment (and folding machines in particular,) is guaranteed to keep us on our toes, but rising to the challenge is equally rewarding.
Special thanks to Marty McKewan of Hemlock Printers, Bob Fruhmann of Packaging Inserts, Reno Cyr Sr. of JS McCarthy and Tony Boucher of The Offset House for their contributions and feedback. This is by no means the final word on the topic, so feel free to share your experiences below!